Contextual Stats
Contextual Stats answer one question: how has each player historically performed in the situation this match is in right now?
It's not a full stat page — it shows only the history relevant to the live moment: tiebreak stats when the match is approaching a tiebreak, "lost set 1" data only after set 1 has been decided, and so on. The history covers the last 12 months.
Opening the view
Click the info-square icon on a LIVE or My Matches row. If the icon is greyed or missing, the current live situation doesn't yet call for situational context (see FAQ below). On My Matches the icon is always present, even pre-match.
The view opens as a pop-up. Stats update as the match situation changes.
Surface toggle
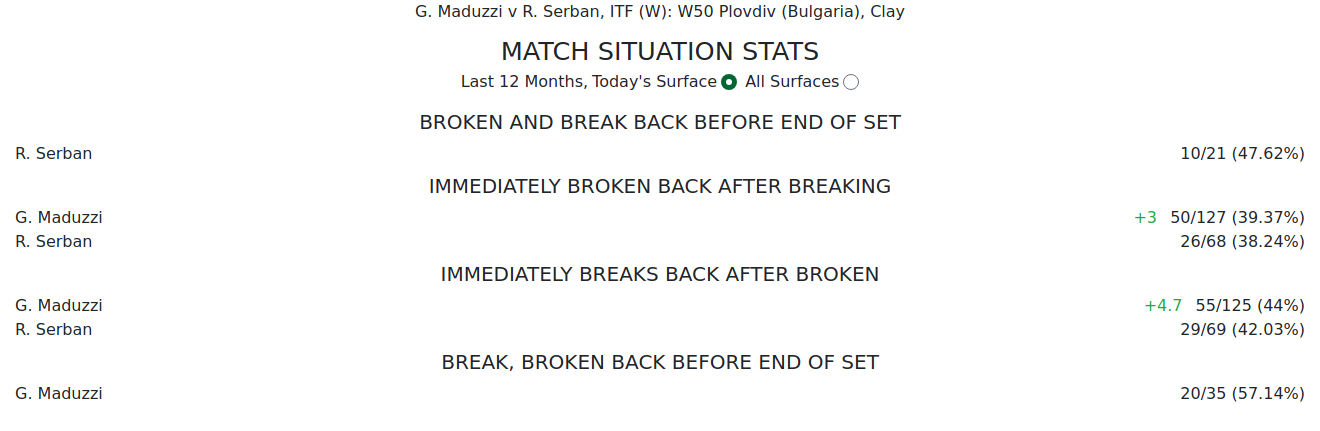
At the top of the pop-up: Today's Surface vs All Surfaces.
- Today's Surface filters the 12-month history to matches played on this surface.
- All Surfaces uses all surfaces combined.
Comparing the two shows you how surface-dependent a player's situational performance is.
The +delta chip

A green +delta chip (e.g. +14.8) sits next to the higher of the two players' figures. It means that player is notably ahead of their opponent on this stat, in this situation — it's a head-to-head comparison between the two players, not a player's own benchmark. The number is how far ahead they are.
Because it compares the two players, the chip can only appear when both players' figures are shown side by side in the same section (see below).
Which sections show the chip
The chip needs both players on screen at once in the same section. That only happens in these sections (when the live moment fits both players):
- BROKEN IN FIRST SERVICE GAME
- GET THE FIRST BREAK OF SERVE
- IMMEDIATELY BROKEN BACK AFTER BREAKING
- IMMEDIATELY BREAKS BACK AFTER BROKEN
- SET 3, BREAK 1ST, BROKEN BACK
- SET 3, BROKEN 1ST, BREAK BACK
Many sections describe a situation that fits one player at that moment (e.g. the player who was just broken), so only that player's figure is shown and there is no opponent figure to compare — no chip. That's expected, not a fault, and the mix of chip / no-chip sections changes as the match state changes.
Sections that appear
Sections are state-dependent — each shows only when the live match reaches that situation, so you rarely see them all at once. Here is every section that can appear.
Serving & break pressure (reachable in almost every set)
| Section | Appears when — and what it tells you |
|---|---|
| GET THE FIRST BREAK OF SERVE | From the start of set 1 until the first break lands. How often each player is the one to grab the opening break of a set. |
| BROKEN IN FIRST SERVICE GAME | At the very start of a set (first game or two). How often each player gets broken in their opening service game — an early-nerves read. |
| HOLD SERVE TO WIN SET (ANY SCORE) | When a player is serving for the set (leading 5-0 up to 5-4, or at 6-5). How reliably they hold that game to close the set out. |
| HOLD SERVE TO STAY IN SET | When a player serves while trailing and one game from losing the set (0-5 up to 4-5, or 5-6). How often they hold under must-win pressure. |
| HOLD SERVE AT 5-4 | The player leading 5-4 is serving for the set. A tighter version of "hold to win" at exactly 5-4 — the classic serving-out moment. |
| BROKEN SERVING AT 5-4, LOSE SET | Same 5-4 serving-out moment, read the other way: how often that player is broken there and goes on to lose the set. |
Break traded back (a break is won, then handed straight back)
| Section | Appears when — and what it tells you |
|---|---|
| IMMEDIATELY BROKEN BACK AFTER BREAKING | Right after a player breaks serve. How often they fail to consolidate and are broken straight back in the very next game. |
| IMMEDIATELY BREAKS BACK AFTER BROKEN | Shown to the player who was just broken. How often they hit straight back and level the set in the very next game. |
| BROKEN AND BREAK BACK BEFORE END OF SET | A player is behind on breaks (or facing a break point). How often they retrieve the break before the set finishes. |
| BREAK, BROKEN BACK BEFORE END OF SET | A player holds a break lead. How often that lead is clawed back off them before the set ends. |
Tiebreak
| Section | Appears when — and what it tells you |
|---|---|
| TIEBREAKS | As a set nears or enters a tiebreak (6-5 / 6-6). Each player's tiebreak win rate — who tends to hold their nerve in the shoot-out. |
After set 1 is decided
| Section | Appears when — and what it tells you |
|---|---|
| LOST SET 1, GET 1ST BREAK IN SET 2 | Start of set 2, for the player who lost set 1. How often they respond by landing the first break of set 2. |
| LOST SET 1, WON SET 2 | In set 2, for the player who lost set 1. How often they level the match by taking set 2 — a bounce-back read. |
| LOST SET 1, WON MATCH | In set 2, for the player who lost set 1. How often they recover from a set down to win the whole match. |
| WON SET 1, WINS IN 2 SETS | In set 2, for the set-1 winner. How often they press the advantage and close it out in straight sets. |
| WON SET 1, WON MATCH | In set 2, for the set-1 winner. How often a set lead converts into the match win. |
Set 2 break swings (specific set-2 sequences)
| Section | Appears when — and what it tells you |
|---|---|
| BROKEN FIRST IN SET 2 AFTER WINNING SET 1 | Set 2 still on serve, for the set-1 winner. How often they are the first to get broken in set 2 (a let-up read). |
| WINS SET 1, SERVES FIRST SET 2, BROKEN IN GAME 1 OF SET 2 | Opening game of set 2 when the set-1 winner serves first. How often they drop that very first service game. |
| LOST SET 1, BROKEN 1ST SET 2, WIN SET 2 (SET AND BREAK) | Set-1 loser who is then broken first in set 2. How often they still fight back to take set 2. |
| WON SET 1, BROKE 1ST SET 2, LOST SET 2 (SET AND BREAK) | Set-1 winner who breaks first in set 2. How often they let it slip and lose set 2 anyway. |
| LOST SET 1, BROKEN FIRST SET 2, GETS THE BREAK BACK | Set-1 loser broken first in set 2. How often they retrieve that break to get back on level terms. |
| WON SET 1, BROKE FIRST SET 2, GETS BROKEN BACK | Set-1 winner broken first in set 2. How often they get the break back rather than fall further behind. |
Deciding set (3-set matches only — least common)
| Section | Appears when — and what it tells you |
|---|---|
| WON SET 1, WINNER 3 SETS | Start of set 3 (one set all), for the player who won set 1. How often winning the opener translates into the 3-set win. |
| WON SET 2, WINNER 3 SETS | Start of set 3 (one set all), for the player who won set 2. How often the set-2 momentum carries through the decider. |
| SET 3, BREAK 1ST, BROKEN BACK | Early in the decider. How often a player who lands the first break of set 3 is pegged straight back. |
| SET 3, BROKEN 1ST, BREAK BACK | Early in the decider. How often a player broken first in set 3 hits straight back. |
A short panel just means few situations apply yet. More sections appear as the match develops.
Notes
Sections show only when the live situation makes them relevant. A short or empty panel is normal early in a match.
The green +delta chip is a head-to-head comparison — "this player is ahead of their opponent on this stat" — and only appears in the handful of sections that show both players' figures together (see "Which sections show the chip").
This pop-up updates automatically as the match state changes. You don't need to close and reopen it.
On My Matches the Contextual icon is always available — use it to pre-read situational history before a match starts.
Tips & Tricks
- Flip Today's Surface vs All Surfaces to gauge how surface-dependent a player's situational form is.
- Read the +delta chip as "this player is ahead of their opponent here" — it only shows where both players' figures appear together.
- Keep the pop-up open as key moments arrive (e.g. when a tiebreak starts); newly relevant sections appear automatically.
- On My Matches, open it before play begins to set expectations.
FAQ
How far back does the history go? The last 12 months of each player's matches.
What does the Today's Surface / All Surfaces toggle change? Today's Surface limits the history to the surface this match is played on; All Surfaces uses the full 12-month history across all surfaces. Comparing the two shows how much surface matters for that player in this situation.
Why do different sections appear in different matches? Sections are tied to the live situation — only those relevant right now are shown. Tiebreak stats appear when a set is in a tiebreak; LS1WS2 appears only after set 1. More develop as the match progresses.
What does the green +delta chip (e.g. "+14.8") mean? It sits next to the higher of the two players' figures and shows how far ahead of their opponent that player is on this stat, in this situation. It's a head-to-head comparison, so it only appears in the sections that show both players' figures side by side (listed under "Which sections show the chip").
Why don't I see a +delta chip in most sections? Most sections describe a situation that fits only one player at that moment, so only that player's figure is shown — there's no opponent figure to compare against. The chip appears only in the sections that show both players together. That's expected.
Why is the Contextual icon sometimes missing? Outside My Matches, the icon appears only when the live state makes situational history useful. Before that point, or when data isn't available, it's hidden — normal.
Why is it always available in My Matches? So you can pre-read situational context before a match starts. My Matches always shows the icon regardless of live state.
Do these numbers update during the match? The stats displayed change to suit the current match situation. The figures displayed are based on pre-match stats.
Are these the same context stats as on the stats site? Same definitions, focused here on the live situation. Definitions are shared in the Glossary.